Ah, addressing an envelope. A dying skill in this era of texting, emailing, and instant messaging. Why, you ask, do you need to know how to address an envelope? What’s next? A tutorial on churning your own butter? Perhaps a deep dive into the merits of horse-drawn carriages?
Jokes aside, there’s still a place for the humble envelope in our world of tech overload. Taxes, wedding invites, letters to grandma — some things just scream for the tactile pleasure of real paper. So, gather ’round ye millennials and Gen Z’ers; let’s journey back to a time when ‘CC’ meant carbon copy, not that little button you hit to secretly include your work buddy in an email chain.
Materials You’ll Need
- An Envelope: It’s like the email icon but 3D.
- A Pen: Think of it as an analog keyboard.
- A Stamp: That’s like prepaying for bandwidth.
- The Address: It’s the URL for the house.
Step 1: Summon an Envelope
Find an envelope. They still exist, often tucked away in the dark recesses of a desk drawer or the back of a stationery shop that also sells “vintage” postcards and scented candles.
Step 2: Arm Yourself with a Pen
Any pen will do, but nothing says “I care” like addressing an envelope in fountain pen ink. A Bic will do, but if you’re going to go analog, go full analog.
Step 3: Decide Who the Lucky Recipient Will Be
Before we etch anything onto this pristine canvas, let’s take a moment to consider who the fortunate recipient of this paper marvel will be. IRS? A pen pal? A long-lost love? Be sure you have their “physical address,” a series of identifiers that tell the postman where to leave the envelope (rather than letting it float indefinitely in the cloud).
Step 4: The Return Address – That’s You, Sherlock!
In the top left corner, write your own address, because you want people to know who the sender of this marvelous relic is. It’s also helpful for the postal service, in case your letter decides to boomerang back to you. Start with your name, then your street address, followed by city, state, and ZIP code. All stacked up like a reverse pyramid scheme.
Step 5: The Main Event: Their Address
Directly below the stamp area, but ideally aligned with the center of the envelope, is where the recipient’s address goes. Yes, just like your love letters, this one should be front and center. You’ll structure it in a similar fashion to the return address, but this one is the headliner.
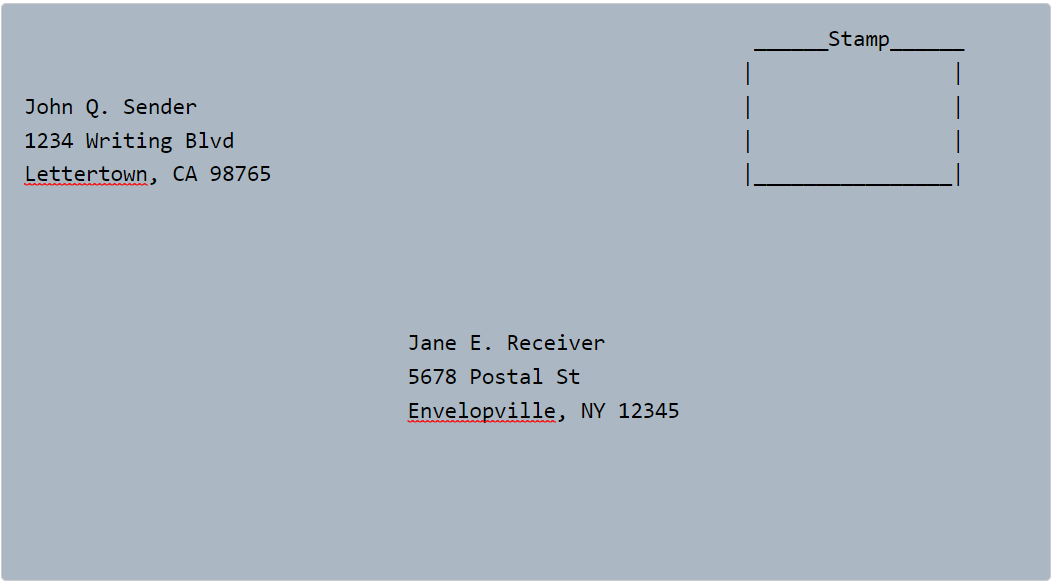
Here’s a fictitious example to illustrate how your envelope should look when you’ve finished addressing it. Mind you, this is a make-believe example and any resemblance to actual persons, living or dead, is purely coincidental. Please replace with your actual details when you’re creating your real-life snail-mail masterpiece.
Step 6: Stick That Stamp
Take your stamp and affix it in the top right corner. Aligning it perfectly is a skill that speaks volumes about your attention to detail, or your propensity for procrastination. Either way, it must be done.
Step 7: Lick It or Stick It
Old-school envelopes require you to lick the adhesive strip on the flap. Newer ones may feature a peel-and-stick system because we live in the future. Seal the envelope. Take a moment to marvel at the sealing process, symbolizing the finality of your arduous journey.
Step 8: Send It Off into the Abyss
It’s time to part ways with your masterpiece. Mailboxes are like the departure gates for your envelope. You could also take it to the post office where human interaction is optional.
And there you have it! You’ve just completed an age-old ritual that your ancestors would be proud of. You’re now ready to fend for yourself in this cruel, paperless world. So, go forth and mail with confidence, because you’ve just mastered the art of addressing an envelope. And who knows, the person at the other end might even write back — provided they remember how to use a pen.