Yoga. The magical practice that promises to grant you the flexibility of a gymnast, the strength of a weightlifter, and the serenity of a monk. Or so they say. If you’ve ever found yourself caught in a pretzel-like pose, gasping for air, and wondering, “Is this enlightenment or am I about to pass out?” then this guide is for you.
Step 1: Find the Right Yoga Pants
First things first: you need the right outfit. And by that, I mean, you should take this opportunity to splurge on fancy, sweat-wicking, gravity-defying yoga pants. Why? Because how else will people know you’re serious about your practice? Sure, they’re a little pricey. But can you really put a price on inner peace? (Apparently, yes, and it’s roughly $98, not including tax.)
Step 2: Choose Your Mat Wisely
Now, onto your yoga mat. This is more than just a piece of rubber; it’s the sacred ground on which you’ll twist, turn, and topple over. You’ll want something that says, “I’m committed to my well-being, but also, I’m not a total bore.” Maybe go for a mat with a mandala design or a bold color that resonates with your aura or matches your nail polish. You know, something really spiritual.
Step 3: Setting the Scene
Before you start, you’ll need to set the mood. Light some incense, or if you’re out of incense, a scented candle will do. The smellier, the better. The idea is to create an atmosphere so thick with the scent of lavender or patchouli that it drowns out the smell of sweat and regret.
Now, let’s talk about music. You’ll want something that’s as ambient as elevator music but less likely to put you to sleep. Tibetan singing bowls, flutes, and the occasional whale sound are highly recommended.
Step 4: The Importance of Hydration
Don’t forget to hydrate. Sip on some alkaline water infused with the tears of a Himalayan monk. If that’s not available, tap water in a reusable bottle labeled “Namaste” should suffice.
Step 5: Picking the Perfect Pose
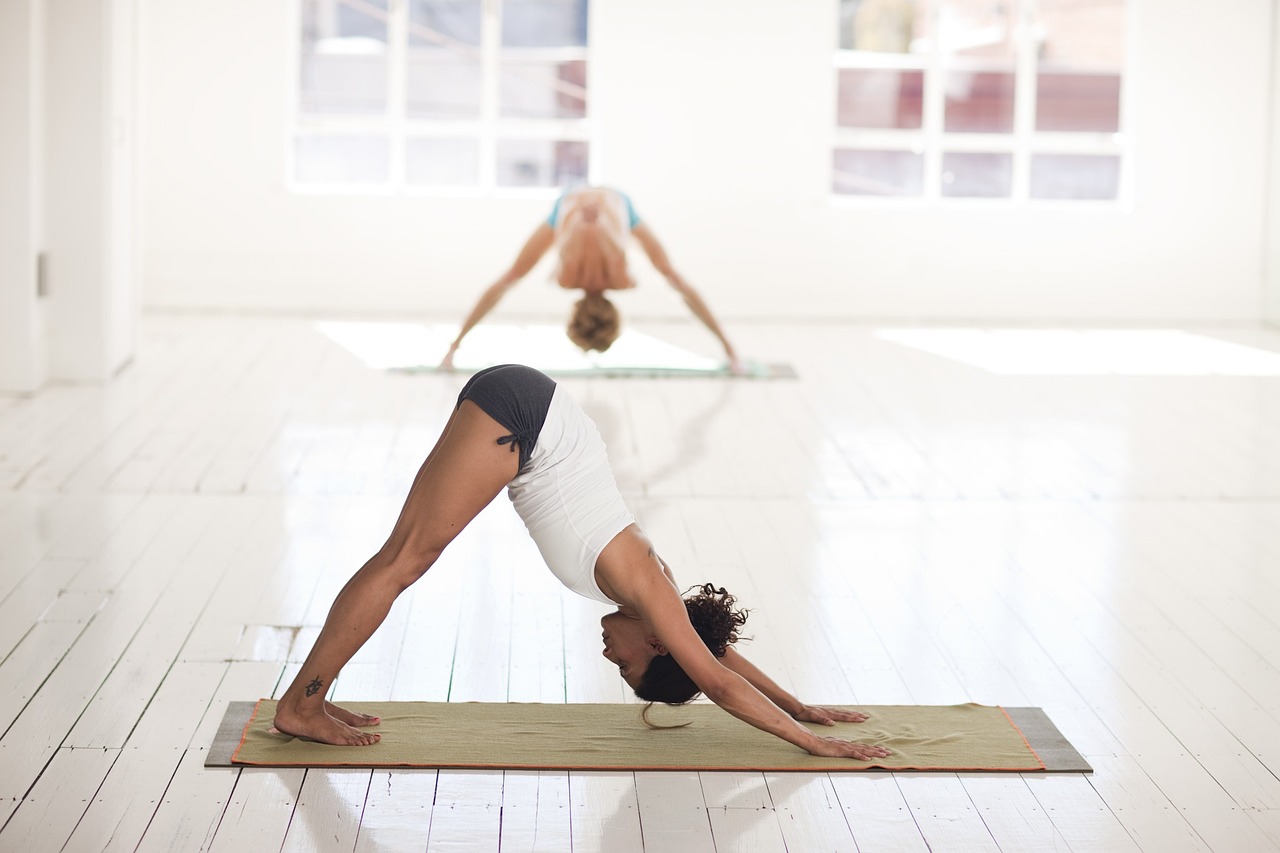
Okay, you’ve done the prep. It’s time to pick your first pose. Now, unless you’re some kind of contortionist or aspiring circus performer, let’s skip anything with the word “crow,” “wheel,” or “death” in its name. How about we start with the Downward Dog? It’s basically just a fancy term for sticking your butt up in the air. Even your dog can do it, and he doesn’t even have a yoga mat.
To execute the Downward Dog, plant your hands and feet on the mat, lift your hips toward the ceiling, and strive for a straight line from your wrists to your tailbone. Now, push your heels down to the ground as if stepping on the hopes and dreams of your enemies. Hold this pose for 5 breaths or until you start to question your life choices.
Step 6: The Almighty Sun Salutation, or How to Greet the Sun Without Getting a Tan
Now that you’ve pretty much nailed Downward Dog — or at least, convinced yourself that you have — it’s time to progress to the famous Sun Salutation. This is basically yoga’s version of a morning handshake with the universe. But don’t be fooled; this isn’t a lazy wave or a head nod. It’s a full-on, elaborate ritual that says, “Hey Sun, what’s up? Wanna help me get bendy?”
Start by standing tall with your feet together at the front of your mat. This is called Mountain Pose, and it’s exactly as exciting as it sounds. From here, breathe in and lift your arms toward the sky as if you’re trying to catch a cloud. Make sure you don’t actually catch one; they’re wetter than they look.
From your cloud-catching pose, fold forward as you exhale, bending at the hips like you’re auditioning for a part in a low-budget Matrix remake. If you can touch your toes, great! You’re more flexible than 90% of the population. If you can’t, just hang there and contemplate your life choices.
Inhale and rise halfway up, placing your hands on your shins. This is the “halfway lift,” and its name is pretty self-explanatory. You’re halfway done with this part of the pose. This is also a good point to take a breather and make sure you haven’t dislocated anything important.
Plant your palms on the mat and step back into a high plank position, like you’re about to do a push-up. Hold it there for a moment, feeling like a plank of wood or perhaps a plankton in the grand sea of life.
From your plank, lower yourself down to a low plank, also known as Chaturanga. It sounds fancy, but it’s essentially a yogic push-up where you keep your elbows close to your body as if they owe you money.
Push through your palms, straighten your arms and arch your back into Upward Facing Dog. Look towards the ceiling or the sky or whatever is above you. If it’s a bird, try not to make eye contact; they find it threatening.
Finally, curl your toes under, push back up, and shoot your hips back into the sky like you’re trying to kickstart a rocket launch. Congratulations, you’ve made it back to Downward Dog!
From Downward Dog, hop or walk your feet back to the front of the mat and return to standing. Take a deep breath in, because you’re about to do it all over again! Most people aim for about five rounds to really get that heart pounding and the sweat dripping.
And that, my bendy friend, is the Sun Salutation. Now, don’t you feel like you’ve given the sun an appropriate salute? I’d say it’s practically waving back at you. Or maybe that’s just heatstroke setting in. Either way, you’re one step closer to becoming a yoga guru or at least not feeling totally lost the next time someone says “Sun Salutation.”
Step 7: The Art of Breathing
Now, here’s the crucial part: breathing. In yoga, you can’t just breathe any old way you want. Oh no, you have to do it “mindfully.” That means you should focus on your breath as if it’s the season finale of your favorite show. Inhale deeply through the nose, hold for a few seconds, and then release slowly through the mouth. Repeat until you either achieve enlightenment or pass out.
Step 8: Remember the Props
So, you’ve mastered — or at least attempted — the Downward Dog and Sun Salutation, and you’ve survived to tell the tale. Congrats! You’ve earned the right to use props. I’m talking about blocks, belts, bolsters, and anything else that makes it look like you’ve brought a mini IKEA store to yoga class. These aren’t just for beginners or for those with limited flexibility; they’re also perfect for people who enjoy the architectural challenge of stacking and arranging oddly-shaped objects while balancing on one foot. Plus, they give you something to fiddle with during the boring parts of class. Multi-tasking!
Step 9: The Mastering of Savasana
Ah, Savasana — also known as Corpse Pose. This is the part of yoga class that everyone secretly looks forward to. Essentially, you lie down on your back and pretend to be dead for 5-10 minutes. It’s like adult nap time, but with more sweat and less drooling (hopefully). The trick to a great Savasana is to relax your body completely, which is hard to do when you’re contemplating the existential void or wondering what’s for dinner. Pro tip: To maximize your Savasana experience, let your eyes glaze over and imagine you’re a cloud, or a floating piece of kale, or whatever it is that calms your restless soul.
Step 10: Exiting the Class Gracefully
Yoga class is almost over, and you’ve nearly reached a state of zen — or at least, you’ve successfully avoided pulling a muscle. Now comes the moment when you have to transition back to the real world. This is arguably the hardest pose of all: The Wallet-asana, where you fish out your credit card to book another overpriced session because, let’s face it, you’re hooked.
But before you leave the studio, don’t forget to roll up your mat in a way that suggests you’ve done this before. You don’t want to be that person awkwardly wrestling their mat into submission. It ruins the whole “I’m so zen” image you’ve been cultivating.
Step 11: Reflect and Rehydrate
After class, it’s essential to reflect on your experience as you sip on a post-yoga smoothie that’s roughly the price of a small car payment. Did you achieve nirvana? Did you manage to touch your toes? Did you make it through class without farting? These are the deep, existential questions that only you can answer.
Step 12: Instagram or It Didn’t Happen
And finally, no yoga journey is complete without documenting it on social media. Make sure you take a post-yoga selfie, preferably in front of a wall adorned with inspirational quotes like “Find Your Bliss” or “Sweat is Just Fat Crying.” Apply at least one sepia filter to capture your newly-acquired aura of enlightenment, and then post it with hashtags like #YogiLife and #NamasteInShape.
There you have it — a foolproof, not-at-all-serious guide on how to do yoga. Whether you’re a seasoned yogi or someone who just wants to touch their toes without screaming in pain, remember: Yoga is all about the journey, not the destination. Especially when that journey involves contorting yourself into shapes that defy the laws of physics and human anatomy. Enjoy your practice, or at least the Instagram likes you’ll get from it. Namaste, or something like that.