Oh, joyous day! You’ve had a splendid romp in the great outdoors, frolicking through meadows and woods like a main character in a low-budget fantasy movie. But wait, what’s this? You’ve brought back a little souvenir, and no, it’s not a pretty flower or a cool rock. It’s a tick! Yes, those tiny, blood-sucking creatures that make your skin crawl just by thinking about them. But fear not, my friend, for I am here to guide you through the fascinating journey of tick removal, armed with humor and genuine advice because, let’s face it, we all need a good laugh when dealing with these pesky parasites.
Ticks – The Uninvited Guests
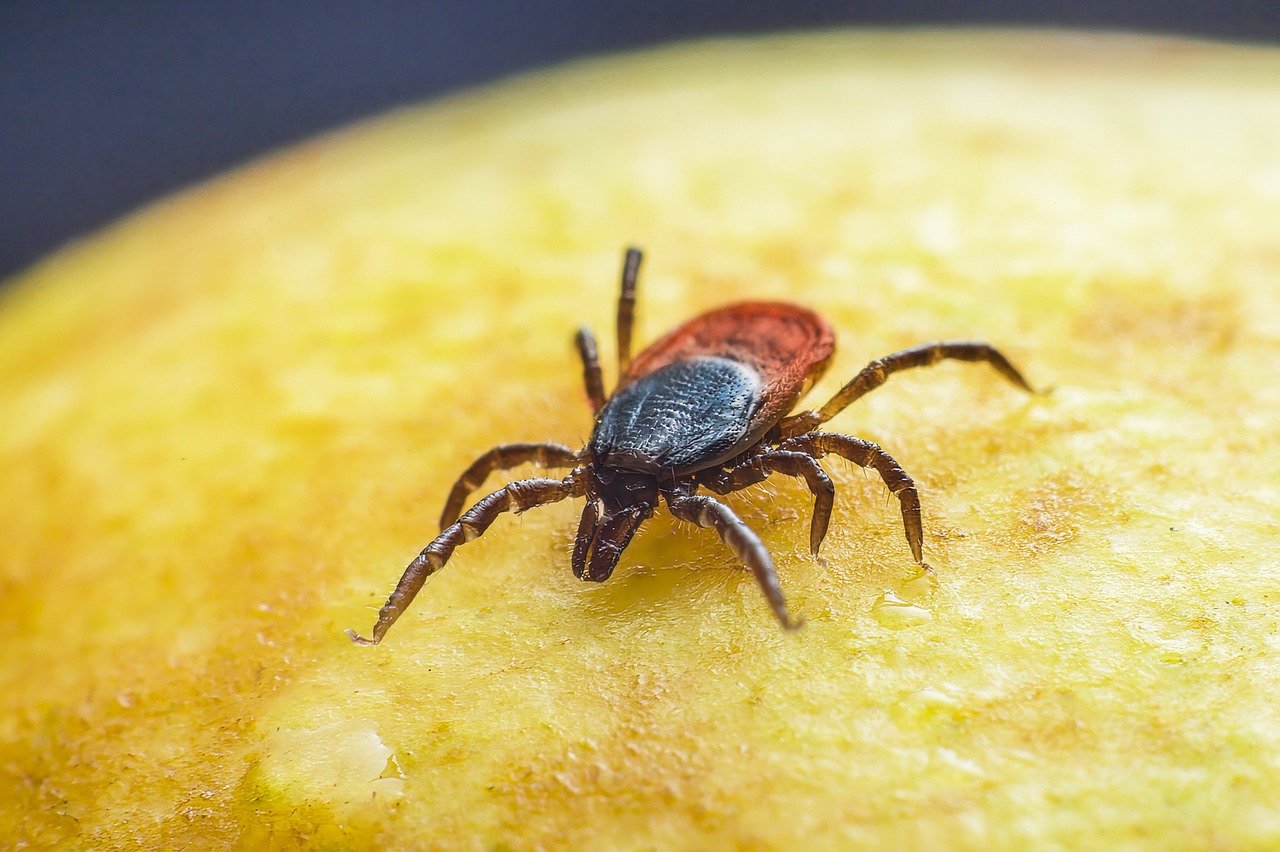
First things first, let’s get to know our enemy. Ticks are arachnids, meaning they’re in the same family as spiders and scorpions (because of course, they are). There are hundreds of tick species worldwide, but only a few are renowned for their human-biting hobbies. In the United States, the main culprits are the blacklegged tick (also known as the deer tick), the lone star tick, and the American dog tick, each with its own charming way of transmitting diseases and making our lives interesting.
Ticks are like the vampires of the insect world, feeding on the blood of mammals, birds, and occasionally reptiles and amphibians. And just like vampires, they have a certain set of skills that make them exceptionally good at what they do. They can sense their host’s body heat, breath, and even vibrations, making them excellent at playing hide-and-seek with us.
But what really sets ticks apart in the world of blood-sucking pests is their ability to transmit diseases. Lyme disease, Rocky Mountain spotted fever, and anaplasmosis are just a few of the greatest hits in their disease repertoire. And let’s not forget the alpha-gal syndrome, a condition transmitted by the lone star tick that can make you allergic to red meat. Because who needs burgers and steaks when you can have tick-borne diseases, right?
So now that I’ve properly introduced our eight-legged frenemies, it’s time to dive into the main event: how to remove these tiny terrors from your skin. Grab your tweezers, roll up your sleeves, and let’s get started with Step 1, shall we?
Removing a Tick
Step 1: Resist the Panic
First and foremost, let’s take a deep breath and calm down. Yes, ticks are gross, and yes, they can transmit diseases. But panicking will only make things worse. So, put on your bravest face, channel your inner superhero, and prepare to battle the tiny vampire latched onto your skin. Remember, you’ve got this!
Step 2: Assemble Your Arsenal
Now that you’ve mustered up the courage to face your eight-legged foe, it’s time to gather your weapons of choice. And by weapons, I mean a pair of fine-tipped tweezers, some antiseptic, and a whole lot of patience. Forget about those old wives’ tales involving nail polish, petroleum jelly, or burning the tick off. Unless, of course, you fancy a trip to the doctor because you’ve just made things ten times worse.
Step 3: The Precise Pluck
With your tweezers in hand, approach the tick with the precision of a surgeon and the bravery of a lion. Grasp the tick as close to the skin’s surface as possible, ensuring you’ve got a firm grip on its mouthparts and not its body. We wouldn’t want to squash the little bloodsucker and increase the risk of infection, now would we?
Step 4: The Steady Pull
Once you’ve got a secure grip, pull upward with steady, even pressure. Don’t twist or jerk the tick; that’s just a recipe for disaster. We’re not making a cocktail here; we’re removing a tick. If done correctly, the tick should pop right out, mouthparts and all. If not, well, you might have left a bit of the tick behind, but don’t worry, we’ll get to that.
Step 5: Clean and Disinfect
Congratulations! You’ve successfully removed the tick, and you’re probably feeling like a hero right about now. But hold off on the victory dance because we’ve got some cleaning up to do. Disinfect the bite area with antiseptic, wash your hands thoroughly, and give yourself a pat on the back for a job well done.
Step 6: Dealing with the Leftovers
In an ideal world, that tick would have come out whole, and you’d be sipping a victory drink right now. But we don’t live in an ideal world, do we? If you’ve left a bit of the tick behind, don’t start planning its funeral just yet. Your skin is a marvelous thing and will likely push the remnants out over time. But if it starts to look red, swollen, or just plain angry, it might be time to call in the professionals. And by professionals, I mean a doctor, not your friend who swears by essential oils.
Step 7: The Tick’s Final Resting Place
Now, what to do with the tick? You might be tempted to flush it down the toilet, give it a Viking funeral, or send it off to the great beyond with a tiny tick-sized coffin. But let’s be practical here. Place the tick in a sealed bag or container, and label it with the date and location of the bite. Why? Because if you start feeling under the weather, that tick might just be your ticket to a faster diagnosis and treatment. Look at you, being all responsible and forward-thinking!
Step 8: Keep an Eye Out
For the next few weeks, you’ll want to keep a close eye on both the bite site and your overall health. If you notice any rashes, particularly one that looks like a bull’s-eye, or experience flu-like symptoms, it’s time to strut into your doctor’s office like you own the place. Lyme disease and other tick-borne illnesses are no joke, and the sooner they’re caught, the better.
Step 9: Learn and Prevent
Now that you’ve had your tick-removal experience, it’s time to learn from it. Invest in some tick repellent, wear long sleeves and pants when venturing into tick territory, and for the love of all that is holy, do a tick check when you come back inside. Ticks might be tiny, but they sure are tenacious, and they have a knack for latching onto the most inconvenient places.
Conclusion
And there you have it, the thrilling conclusion to our tick-removal saga. You’ve laughed, you’ve cried (hopefully from laughter), and you’ve successfully removed a tick like a champ. So go forth, enjoy the great outdoors, and remember: ticks might be tiny, but with this guide in hand, you’re more than equipped to handle them. Until next time, stay tick-free, my friends!
Pro Tips: Becoming the Tick-Removal Master
Congratulations on making it to the end of our tick-removal extravaganza! By now, you’re practically a PhD in Tickology (not a real degree, but it should be). But wait, there’s more! Here are some pro tips to truly elevate your tick-removal game and ensure you’re the go-to tick expert in your social circle. Because who wouldn’t want that prestigious title?
Tip #1: Get Acquainted with Tick Hotspots
Understanding where ticks like to hang out is half the battle. Ticks love wooded areas, tall grasses, and leaf piles. They’re basically the vampires of the insect world; they love the shade and they’re out for blood. So, keep this in mind when planning your next outdoor adventure.
Tip #2: Dress for Tick Success
When venturing into tick territory, dress like you’re going to a tick avoidance fashion show. Wear light-colored clothing so ticks are easier to spot, tuck your pants into your socks (fashion-forward, right?), and consider treating your clothes with permethrin, a tick repellent that can be applied to clothing.
Tip #3: Master the Tick Check
Performing a thorough tick check after coming indoors is a crucial step in tick prevention. Check all the nooks and crannies, including under the arms, in and around the ears, inside the belly button (yes, ticks are bold), behind the knees, and even in your hair. Make it a family affair and check each other, because two (or more) sets of eyes are better than one.
Tip #4: Don’t Forget About Fido
Ticks don’t discriminate, and they love hitching a ride on your furry friends. Check your pets for ticks regularly, especially after they’ve been outside. Consider talking to your vet about tick prevention for pets. Because the last thing you want is for your four-legged friend to bring home unwanted guests.
Tip #5: Be Tick Aware, Not Tick Scared
Ticks might be creepy, but with the right knowledge and preparation, they’re manageable. Be aware of the risks, take preventative measures, and remember that tick removal is not the end of the world. It’s just a tick, not a monster (even if it feels like it at the time).
Tip #6: Spread the Tick Knowledge
Now that you’re a tick-removal aficionado, spread the knowledge! Share these tips with friends and family, and become the tick guru you were always meant to be. Because nothing says “I care about you” like a thorough lesson in tick removal.
Tip #7: Stay Updated
Tick species and the diseases they carry can vary by region and are changing over time. Stay informed about the ticks in your area and any emerging tick-borne illnesses. Knowledge is power, especially when it comes to these tiny bloodsuckers.
Frequently Asked Questions: The Tick-Removal Edition
While those tweezers are probably fabulous for plucking eyebrows, they might not be fine-tipped enough for tick removal. You really want a pair of pointed tweezers to get a good grip on the tick without squishing it. But hey, in a pinch, use what you’ve got – just be extra careful.
Yes, size doesn’t matter when it comes to ticks (though they probably wish it did). Even the tiny ticks can transmit diseases. So grab your tweezers, steady your hand, and show that mini monster who’s boss.
Ticks are sneaky little creatures, and they don’t like to rush their work. Most of the time, a tick needs to be attached for 24 to 48 hours before it can transmit diseases like Lyme disease. But some other tick-borne diseases can be transmitted more quickly, so it’s best to remove the tick as soon as you spot it.
While the flicking reflex is strong when we see something creepy crawling on us, it’s better to resist the urge. Instead, pick the tick up with a tissue or a piece of tape, and flush it down the toilet or stick it in a sealed bag. Because flicking it away means it could come back for round two.
If you’ve successfully removed the tick and it hasn’t been attached for a long time, you’re probably fine to just keep an eye on the bite site and your overall health. However, if you start experiencing symptoms like a rash, fever, or fatigue, it’s time to strut into your doctor’s office and tell them about your tick encounter.
If you develop a rash, especially one that looks like a bull’s-eye, make an appointment with your doctor. This type of rash can be a sign of Lyme disease, and early treatment is key. Don’t panic, but do get it checked out.
Ticks are annoying, but they can’t transmit diseases until they’ve sunk their teeth (or rather, mouthparts) into you. So if you find a tick crawling on you, just remove it and go on with your day. But maybe do a happy dance because you caught it in time.
While you might not be able to create a tick-free utopia, there are steps you can take to reduce ticks in your yard. Keep your grass short, clear away leaf litter, and consider placing a barrier of wood chips or gravel between your lawn and wooded areas. And if all else fails, just remember: you’re a tick-removal pro now.
Stay calm, grab your fine-tipped tweezers, and remove the tick as you would from yourself. Kids can be wiggly, so you might need an extra pair of hands to help keep them still. And remember, tick removal is a great life skill to teach – they’ll thank you when they’re older (maybe).
It’s okay, ticks are creepy. But with the right knowledge and tools, they’re manageable. Just remember to check for ticks, dress appropriately when you’re in tick territory, and remove any ticks promptly. You’ve got this – and hey, you’ve always got this article to refer back to for a laugh and some solid advice.